Our BlogTips, Tricks, and Thoughts from Cerebral Gardens

App Store 2.0

AppStore2Heade_20200825-065356_1

I've been saying for years that we need a new App Store. With the Epic/Apple battle being played out in public, I figured I'd describe my current vision for a new App Store model that better serves users today. The obvious answer is just to move iOS to a macOS like system but it's just as obvious Apple isn't willing to do that. My proposal is a compromise that I believe offers a fair direction forward for all parties involved.

First, let me describe the assumptions I'm working with. I'm sure I'll miss something, hopefully nothing that would drastically affect my proposal though. Of course, message me if you think I need to include something I haven't and I'll add updates.

Some Assumptions/Assertions:

  1. It's impossible to create an environment that is both useful and 100% safe. Just being alive puts you in danger. This is normal. The goal isn't to be 100% safe, it's to find the point at which users are reasonably safe while still being functional. Anyone that tells you the current situation is 100% safe is lying to you. Arguably, it's also a disservice to tell people they have no risk, or even create a situation where there is no risk.

    Example 1: Even though viruses/malware are rare on macOS, computer experts should never say "get a Mac, they don't get viruses," since then users would think they're safe to just download anything anyone tells them to.

    Example 2: Outside of tech, take the case of playgrounds. In "the old days," as a kid, you could go to the playground and slice your hand on a rusty part, or fall 20 feet from a climbing cage. New regulations made playgrounds ultra safe, all plastic bits, no sharp edges, nothing high enough that you could fall and break a bone. Not only does this create a false sense of security since you can still fall and break something from ground level, it also takes away the opportunity for kids to learn how to evaluate risk.

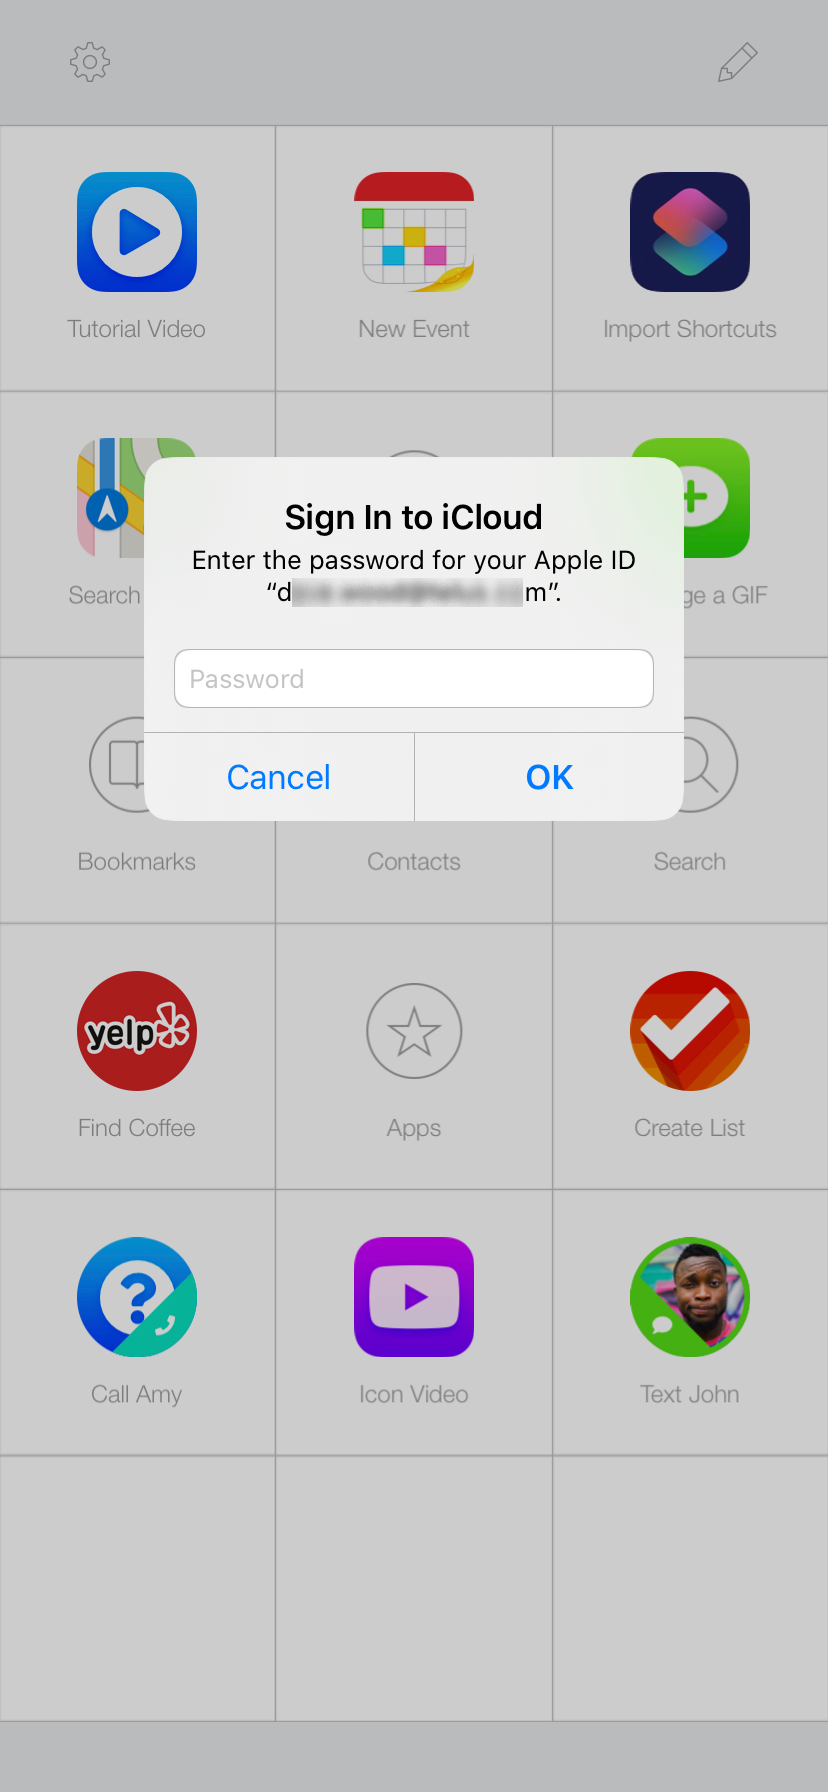
    Since things can never be 100% safe, it's important for people to also consider the possible outcomes of doing something. Ensure they consider what can happen if they grant an app access to their photos. Think about why a dialog is asking for their password. Teach them to manually save documents as they're working, even with auto-save, sometimes things go wrong. Teach them to make backups on a regular basis, "just in case". Funny story: I wrote the first draft of this post on my iPad in a beta version of an app. When I came to proofread the next day, the beta had expired and the app was no longer in TestFlight. I'd been copying it into Notes every hour or so "just in case" and well, case happened.

  2. The App Store itself does not add to the security of iOS devices. Security is provided by various technical means such as user permissions, sandboxing, certificates, kill switches, etc. Some would include App Review in there, but that system is fallible, as we've learned.

  3. Different things require different levels of security. For example, personal information such as your name and government identifying numbers require the highest level of security. Photos, contents of emails, contacts etc. require a high level of security, but not quite as high. Payment details (credit card numbers) would be next in line requiring a medium level of security. The reasoning for this is that if someone compromises your government ID, they could cause all kinds of irreparable damage, but if someone gets your credit card number, it's mostly just an inconvenience since fraud happens so often the credit card companies have systems in place to reverse the damage. After all you're giving your credit card number to pretty much every company you buy stuff from online. Not to mention your physical card broadcasting the info to anyone with an RFID reader in their pocket.

  4. Apple isn't the only company you can trust with your credit card number.

  5. Everyone involved in the app ecosystem wants a fair system. Companies or individuals that want to leech off the work of others without contributing something back are not worth the time to consider.

  6. No company should be able to dictate if another company can sell their product/service. That's a job for governments.

  7. Apple is not a government.

  8. Apple builds iOS and the API used by developers for themselves. This isn't something they've built as a service to developers and for which they need to be compensated. They built iOS and its API's before they ever considered an App Store and allowing third party developers to build apps for the platform. The concept of the App Store was originally implemented by jailbreak users in the iPhoneOS 1.0 days called Installer.app (Wikipedia).

  9. Apple means well, but might be too over-protective for their own good.

My Personal Notes

Second, let me state that my personal opinion is that Apple's fee of 30% is not a problem in itself. The problem with the 30% fee is forcing it on developers and not allowing them a choice of service provider. Apple seems to truly believe they're offering value for that money, so opening things up gives them an opportunity to prove it.

More than that, my biggest complaint with Apple is the power they have to decide if another company should be allowed to provide their product/service. They are able to block any app that competes with them (now or in the future), is innovative in any way Apple hadn't considered, or that goes against their values. Apple shouldn't be allowed to project their values onto their customers. If their customers want porn apps, so long as they're legal, they should be able to buy and install them. If customers want to run an app that devours their battery, they should be allowed to do so. It's important to realize that Apple saying "Company X can't sell Y" is the same as saying "Customer Z can't buy Y even if they understand the implications".

The Proposal

With all those points out of the way, here's my proposal for a new App Store model that aims to solve most of these problems.

Apple keeps App Review in place with some changes. Apps are graded into quality tiers:

  1. rejected: illegal — this one will need to handle various jurisdictions
  2. rejected: malware — attempts to circumvent device security etc
  3. accepted: excluded from App Store — low quality/goes against Apple's values/competes with Apple/whatever else
  4. accepted: allowed in App Store — high enough quality to be promoted in the App Store

The key difference being that Apple accepts anything that isn't illegal or a valid security issue, but not every accepted app gets listed in the App Store. An app that has been accepted, but excluded from the store can be installed by a user that has a direct link provided by Apple upon approval. Side note: this gives Apple a great opportunity to optimize the App Store since they can remove the millions of junk/neglected apps and only present the best apps to users.

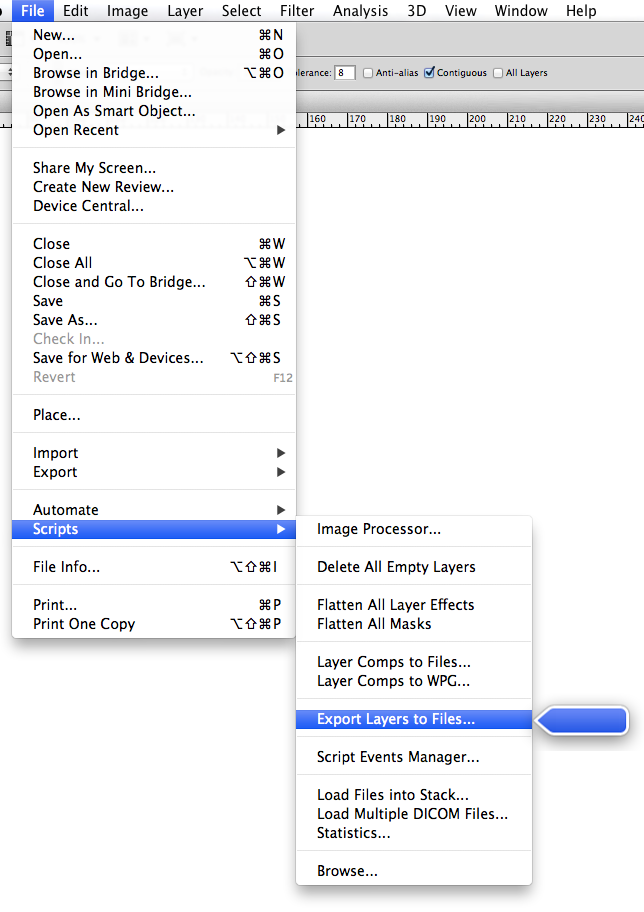
Next, Apple allows alternate store fronts, I'll call these Store Front(s) as a generic term to differentiate from Apple's App Store. These are apps that act as alternate stores users can use to find and install apps. They can include search, categories, editorials, or none of these, it's up to that store runner and how they think they can best serve their users. Store Fronts can list apps that are included, or excluded from the App Store. When a user installs an app from a Store Front, it uses Apple's API to install the app from Apple's servers.

Note, so far, all of this is possible with today's tech already in iOS. Store Front would be just like TestFlight, installing apps securely from outside of the App Store.

Handling payments in Store Front would be something new. While I assert above that Apple isn't the only company it's safe to give your credit card info to, let's stick to exclusively using Apple's payment system in this first step forward. When a user installs a paid app, it still triggers Apple's payment system, same as now, and calls back into the Store Front app with a success or fail response if the purchase (and install) was successful. When the app is installed (paid or free) from a Store Front, the receipt records which Store Front was used in order to handle commissions for the initial sale, plus any future IAPs.

So how is the money split in this new system?
  • 3% Payment Provider (always Apple in this first phase)
  • 7% Apple (covers platform/review/distribution costs)
  • 0-20% App Store or Store Front

The 0-20% for the Store Front is variable and is set in a new section of App Store Connect. App owners will have to authorize whether a specific Store Front is authorized to sell their app(s) and for what % range. A Store Front can use the commission % to compete with other Store Fronts. A range can be set for each store to allow for deals like a featured listing earning the store 10% while a standard listing nets 5% or something similar. Apple should also implement a range and earn a higher percentage for featured listings over a search result. Of course, an app owner can also elect not to have their app listed in the App Store if they choose.

Regardless of which Store Front makes the sale, Apple will process the payment and will split the proceeds from the sale according to the agreed %'s. Apple pays out commissions to the Store Fronts similarly to how they currently pay developers.

So what does all this accomplish?

It solves what I feel is the biggest anti-trust issue with Apple where they can prevent new innovative ideas from being explored.

It maintains all current security measures including user permissions, sandboxing, certificates, and a kill switch (including the problems associated with that).

It enables Apple to continue to earn 30% of sales they facilitate through the App Store.

Customers can still make purchases easily with a single Apple ID.

It allows third parties to create new innovative/curated Store Fronts and earn a commission for sales they facilitate, while still paying Apple a fair cut.

It allows developers to self-promote their apps and save on their commission costs, dropping it from 30% to 10% when their marketing creates the sale. This in turn can revitalize the decimated App Review sites since developers might actually be able to afford to buy online ads and sponsorships again.

What doesn't it do?

It doesn't solve the issue of free apps being able to use all the same development and distribution tools that Apple provides without contributing to those costs. For that, I'd like to see a per user, or per download (perhaps based on file size) cost that is paid by the developer of the free app. If it's $0.25/user for example, that should be a bearable cost (part of the marketing budget) for that company. But this needs to be explored in a whole other post.

It doesn't solve the issue of allowing alternate payment systems. As I stated earlier, this is a first stage. By separating out the payment provider and Apple platform commission %'s, I've opened the door to allow other payment systems later. The hard part is going to be managing the split of the proceeds if a different payment system is used. I also believe that if the payment % is dropped to 3% as I've done here, there's less of a reason to want to use an alternate payment system anyway. Except for the next point...

It doesn't solve the issue of developers not knowing who their customers are. Which an alternate payment system could help with. But if a developer really wants to know who their customer is, they can just ask in the app via an account system. If the user consents, they can supply their info. That feels like a fair way to handle it. Forcing a user to disclose their real identity just isn't cool in today's world.

Bonus notes:

  1. One implementation detail to note: when a user buys an app from a Store Front, it would still show up in their normal 'Purchase History' where they can reinstall just as they can do now. It would list the name of the original Store Front, but they wouldn't need to go back into that app to reinstall since it would be possible that Store Front has closed.

  2. I've written this with Apple in mind, but I believe the same system can and should be implemented by others in the industry, including the game console makers.

  3. While Apple's % take will drop in some cases by implementing this system, I believe they'll actually make more money in the long term. Their devices will become even more powerful as new innovative apps are released for them. Fewer developers will be pushed toward making web and/or Android apps, or pushing customers to make their purchases outside of their apps.

  4. I wonder if Apple feels, even if they want to reduce their fees, they have to fight this battle in court and be forced to make any changes in order to avoid being sued for breach of fiduciary responsibility to their shareholders? IANAL!

  5. Everyone always cites the 30% number. But it's actually higher than that in a lot of cases. On top of the 30%, developers need to pay $100 USD annually for their developer account. They must buy Mac hardware because Apple's rules state all apps must be built on Apple branded hardware. But the biggest hit here are Search Ads. Developers often have to bid on their own app name and pay Apple extra $ just so their app comes up first in the search results when someone specifically searches for it. When Search Ads were first launched, I tried them out and all it did was drive my 30% fee up to 90+%.

  6. I can't wait to see some of the really cool innovative apps that will come out. Even simple things like a third party phone dialer could lead to new ways of doing old things.

Addendums:

  1. 2020/08/25 11:30am: Dave Murdock suggests Store Fronts would need to go through App Review as well. And yes, agreed, they're apps and so each update would be reviewed just like other apps. Further, I envision that in order to submit a Store Front, you'd need to be approved with a new type of developer account with it's own agreements, and most likely an additional fee, similar to Enterprise Developer Accounts.

2020 WWDC Security Wish List

WWDC 2020

We're hours away from the 2020 WWDC Keynote. Over the last week there have been tonnes of conversations about Apple's policies and while I'm on the side of change, this post isn't about that.

I've been compiling this list of security features that iOS needs for probably more than 5 years now, and every year around WWDC time I plan to publish it, and never actually get to it. Today, that's changing.

Here's my list of security features I'd love to see in iOS sooner rather than later.


1. Increased user control over device locking

There are multiple features that need to be added here.

a) A system level method that allows the user to lock the device underneath the currently open app. This means, keep the current app open and accessible, but the rest of the device is locked. You can't swipe to another app, you can't go back to the home screen, you can't tap on a notification and have it switch apps, in fact, if you have content in notifications hidden while the device is locked, incoming notifications in this mode would also be hidden.

Why add this feature? Because many apps used today require the app to be open for an extended period of time, so using those apps increases the risk for the user.

Examples:

Games (Pokemon Go): You need to keep your device open while you're walking around looking for Pokemon. If someone jumps you and steals your phone, it's unlocked and they have full access, just because you were playing a game. Of course, other games require you to keep the phone on because you're actively using the screen.

Sleep Trackers: There are apps that you leave open and running next to your bed while you sleep. They listen for your movements, snoring etc, to track your sleep. Doing this however leaves your phone unlocked and exposed for hours at a time while you're asleep. Ignoring people in your home that may exploit this situation, there's always the possibility of a thief (or even law enforcement) breaking in.

Video apps (Netflix etc): Want to watch the latest movie on your phone? That will keep your device unlocked for around 2 hours. Same risks apply, you could fall asleep, have someone grab the phone out of your hands etc.

Grocery Lists: In the age of COVID when we're all wearing face masks whenever we leave our homes, unlocking your phone becomes extra tedious. It's not unusual to disable phone locking while grocery shopping so you can constantly refer to your list without entering your passcode hundreds of times.

COVID Bluetooth trackers: Since Apple has blocked background Bluetooth access, several companies are releasing COVID Contact Tracing apps that use Bluetooth, but require the app to run in the foreground. Again, a serious security risk.

Allowing the user to lock the device underneath the current app solves these problems. The user can keep using the app in question, without risking the security of the rest of the device. This can be done with a gesture each time to trigger that you want to lock the device, or it could even use a timer that just auto locks the device under any app that is in the foreground for a specified time.

b) Allow a user to specify certain apps that can be used even if the device is locked. The UI for this feature would likely add those app icons to the lock screen so you can just jump right into them, locked or not. Same cases above are solved.

c) Use the Apple Watch to automatically lock your phone. If your phone moves too far away from your watch, auto-lock it. This handles cases where someone grabs the phone from your hand, and also cases where you leave the phone at your desk when you go to the washroom or something (back in the days when people went to offices). A bonus would be if you could disable Touch/Face ID via your watch.

If I can only have one of these security improvements this year, please let it be this one.


2. Improve the 2FA used on our Apple accounts

Apple's 2FA is one of the worst available. It's only better than systems that still use SMS for the second factor.

Ideally they allow you to store the key so you can use any standard 2FA app. At a minimum, they need to fix the geo-location on alerts. Telling me someone 150 kms away is trying to log into my account when it's really me on another device right next to me is pretty pointless. At least show me the IP address that is being used, and if it happens to be the same IP as the device you're showing me the alert on, tell me that too.


3. Secure the password dialog boxes used for our Apple accounts

The system can ask you for your iTunes/iCloud credentials at any time. This can happen while you're in the settings, the App Store, or even a random third party app. And the dialog is a standard dialog that any app can present. Most users use the same email address for their Apple ID as they do to log into apps, web sites, etc. This allows for unscrupulous apps to phish the user and trick them into giving up their vital Apple account password.

It is possible for advanced users to distinguish the difference between a dialog Apple is presenting and one presented by an app (swiping up on a system dialog is disabled), but try explaining that to normal users, never mind actually expecting them to test every time they're presented with a password request.

A simple solution would be to have a uniquely customized dialog box when the system is asking for your credentials. This unique dialog would not only include the email address of the account in question, but would display a secret image or pattern that was pre-selected by the user when they created their Apple account. This would need to be added to existing accounts during their next upgrade process.

Current Dialog   >   Suggested Dialog


4. Multiple users (including a guest account) on iOS

This is a simple one, and pretty self explanatory. Often someone wants to 'just borrow your phone for a sec'. A guest account with access to non-sensitive apps would make it easier and less risky to help someone out.


5. Improvements to Touch/Face ID

Add other options to the "Require Passcode" other than 'Immediately' when using Touch or Face ID. I've been asking for this change since Touch ID debuted, mainly because when debugging in Xcode, it's really annoying having to constantly unlock the phone while you're trying to install the newest build. You'd unlock the phone, build & run, then the phone would lock before the build started and you'd have to unlock it again.

With COVID, this is an important feature for people that aren't developers. See above for the grocery list scenario. When wearing your mask, being able to enter your password only once every 5-15 minutes would be a huge benefit.

No choice!


6. Atomic app upgrades

When apps upgrade, it should be an atomic process. I've seen cases where app A is installed and working, then it upgrades via the App Store, but the network drops during the upgrade process. The app becomes unusable now. You can no longer access the data until the system completes the upgrade process.

Granted, listing this as a security fix is a bit of a stretch. But one of the times I saw it happen, it was 1Password that became unusable. I consider not having access to my passwords a security issue.


7. Medical ID

Users should be able to add photos to their Medical ID profile. This could include QR codes, scans of their hospital cards, insurance information, scans of medical history, prescriptions etc.


Acknowledgements:

My thanks to Markus Winkler at Unsplash for providing the photo used as the sample security image in the updated password dialog box.

Introducing OTAgo, an OTA app distribution system

OTAgo

Over-the-Air (OTA) app distribution is one of the methods Apple provides that allows you and your users to securely install iOS apps on devices. Other methods you've most likely seen and used are directly installing the app via Xcode on a device in your possession, TestFlight (Apple's beta distribution system), and of course via the App Store.

Each of these methods has their purpose.

  • Direct via Xcode: Debugging and initial testing
  • TestFlight: Beta testing
  • App Store: Distribution to customers

So when is the OTA method needed?

Not every app can be distributed via the App Store: In-house apps for your staff, apps that Apple may not approve, or custom apps for your business customers that need to be distributed via Apple's private B2B store.

If the app you're building can't be distributed via the App Store, you're unable to use TestFlight for beta distribution either. OTA is a great way to distribute beta versions, and/or release builds for these apps.

Should you use OTA to distribute your apps?

Most likely, no. If you can use TestFlight and the App Store, use those. If you're building enterprise apps, or have a very early build that you can't get approved for TestFlight distribution yet, then OTA may be for you.

Why use OTAgo?

Setting up an OTA distribution system isn't very difficult. When you use Xcode to build your .ipa file, it gives you an option to create a manifest.plist file that's required for OTA distribution. You can basically drop that manifest.plist and your .ipa on your web site and set up the appropriate links. However, doing it this way, doesn't give you any protection and anyone that finds the link can install your app.

You can put the link behind basic authentication using Apache's .htaccess, or similar via nginx. But since iOS 13, using basic authentication requires the user to enter their credentials 3 times each time they install a build.

See @GeekAndDad's tweet here:

You might be thinking, let's just use an obscure link no one will find, and we'll rely on security by obscurity. This of course is never a good plan, with search engines and malicious web spiders, your hidden link is unlikely to stay hidden.

On top of that, Apple has a new requirement that's coming into play in 'Spring 2020'. Due to rampant abuse of Enterprise accounts being used to distribute apps outside of the App Store, Apple is cracking down and now asking developers using an Enterprise profile how and where the app will be distributed. They're requiring developers to use a secure authentication method. This means either username/passwords or a restricted network accessible only via VPN/Intranet. See a screenshot of the current settings (note you'll only see this in your developer account if you're using an Enterprise account):

Screenshot from the Dev Portal

OTAgo handles the secure authentication for you, and it does it in a way that works around the requirement to enter a username/password 3 times. I've designed it in a way that it should be easy to set up and configure. The initial version includes a `simpleAuth` mechanism that lets you authorize users as simply as providing a list of username/password pairs.

I've also made the authentication system pluggable, so if you want or need to link into an existing authentication mechanism, you can do so by adding in your own plugin. If OTAgo proves to be useful/popular, I'll likely add some additional authentication methods, OAuth, MySQL/MariaDB etc. Of course feel free to send pull requests with additional ones. :)

You can check out the project here: https://github.com/DaveWoodCom/OTAgo. Let me know what you think. If you find it useful, please star it on GitHub!

Acknowledgements:

My thanks to Freepik at flaticon.com for providing the koala used in the OTAgo logo.

Also thanks to Paweł Czerwiński on Unsplash for the background of the banner above.

Why did I reserve a Tesla Cybertruck?

CyberTruck

Abbey Jackson messaged me on Twitter:

I started to reply with a tweet, then figured it would take a few tweets so started a thread, then realized this needed to be a full blog post...

First, note I'm not a truck guy. I'm an SUV guy. But I appreciate how useful a truck can be when needed (I've borrowed my bro-in-law's F150 on more than one occasion). The Cybertruck looks like it will feel more like an SUV than a truck, and actually, I could see it shipping with an SUV option at some point.

Stainless steel is awesome. I've always wanted a DeLorean even thought about electrifying one as a side project at some point. The strong panels are a major bonus. My Bolt was dented when ice slid off my house and hit the hood during last spring's thaw. Over $1000 in damage. Also, I'm paranoid about a-holes keying Teslas. Granted there's a low probability of it happening, but I figure if it'll happen to anyone, it'll happen to me (I'm just that lucky).

The transparent steel windows look great (regardless of them failing during the demo). Making it harder for thieves to smash and grab will be a benefit since Telsas are often targets. Impressive to see a company actually use transparent metal too, it shows they're reconsidering everything, even if it's already "a solved problem".

Then of course, there's the non-tech aspects. I'll admit I've always liked the Hummer. But their gas guzzling nature of course has always prevented me from really looking at getting one. It might just be me, but drivers of Hummers and similar vehicles always seem to give the impression they just don't care about the world, and almost take pleasure in actively hurting it. Almost like they're shouting: "Look at me, obnoxious as hell, f*king up the planet!". Driving the Cybertruck feels like it'll be similar to me shouting: "Look at me, obnoxious as you, but helping the planet!"

I'm always trying to convince others to go electric when purchasing their next new vehicle. But everyone always has an excuse about why they have to stay with gas, and driving the Cybertruck will be proof that most of their "reasonable" excuses just aren't valid anymore (and I'll be able to take them for a ride to demo why):

"I drive to Florida and back once a year so I need 2400 km range (cause I drive for 24 hours without stopping to eat or pee)"
  • — The tri-motor version will have 800 km range! That means you can drive to Florida (from Ontario) only needing to stop twice at a supercharger, that's less than the number of times you'd have to stop for gas.

"I have to use my vehicle for work, so it needs to be rugged, tough and able to carry all my stuff"
  • — Payload 3500 lbs! Tows 14,000 lbs! My Cybertruck will crush your puny work truck. 'nuf said.

"Electric vehicles cost too much (because I suck at math and can't add up the deferred costs of gas, maintenance, or factor in the environment damage we'll have to pay for later)"
  • — $40-70K USD! With nearly zero maintenance costs, really low fuel costs, probably cheaper insurance costs, and no damage to the climate to pay for later1.

"I'm special and shouldn't have to consider the damage I do to the world, someone else can clean up after me, gas is just easier because I already understand it"
  • — Ok Boomer. There's no convincing these people with logic and facts, I'm trying not to waste too much time and energy on them anymore.

"Electric vehicles are bad for the environment because they just move the emissions from the car to the power plant"
  • — Same with these people. In Ontario, our electrical grid is very green (about 85% emission free), and even if you live in an area with coal plants it's still better for the environment to drive electric because your total emissions will be reduced and will continue to decrease as those plants are decommissioned.

"I have kids and need a mini-van for car seats, dogs and hockey bags"
  • — Model X solves this one already, but everyone always balks at the price tag. Cybertruck will be a decent answer with a great price, but I know some of my family and friends will still swear they need a Mini-Van option. Amazed no one is making an EV mini-van yet, huge hole in the market that needs to be filled (Chrysler Portal maybe).

While I don't "need" a truck, and I'd prefer an SUV, I already have a Bolt (considered getting a second but I think I'd rather diversify), and while I'd love a Model X, I'm an indie2 app developer in a market where people don't want to pay for apps so I can't justify the cost of an X. The pricing on the Cybertruck is amazing. The dual motor Cybertruck is just over half the cost of the lowest end X. $49,900 vs $84,990 (USD for consistency).

Elon tweeted that a pressurized version of Cybertruck will be used on Mars. I’m not sure if people think he was serious or joking, but I can see it as a real possibility. How cool would it be to drive a Martian truck?

Now, will I actually buy a Cybertruck in late 2021 when they go into production? Which likely means it won't really be available until 2022 (in Canada). That's 2-3 years from now. I actually need a second EV soon since my wife's ICE car is nearing death. We're stretching it out as long as possible, waiting for either the Model Y or the Rivian R1S to ship (to Canada of course). Who knows what my situation will be in 2-3 years when the Cybertruck ships. Maybe one of my apps will take off and I can buy an X. Maybe I'll be working at Apple, Tesla or Rivian (call me 😁). Or maybe I'll be completely happy with whatever I buy in 2020. If stars align and it makes sense, then yes, I'll buy a Cybertruck once it's available. If it was shipping today, it would be on my driveway already. It's not, so the reservation will have to do. The fully refundable deposit is only $150. Compared to the $1000 deposit for the Model 3, this one is chump change. Worst case, it's an interest free loan I'm giving Telsa for a couple of years. Best case, it gets me to the front of the line when they do ship.

Update: just had an interesting interaction that might expose Elon’s hidden genius with Cybertruck. I had a conversation with a gas driver today, someone who has always resisted electrics. I showed them the Cybertruck which they hated the look of, but then they said: "did you see the electric Mustang just announced, I’d rather get that...". Suddenly the question became which electric vehicle to get, not electric vs gas. That’s a serious win!

Footnotes:

1: At some point, we're going to have to pay to remove CO2 from the air. This is a cost that will have to be paid by our governments, and everyone just ignores it and treats it as not their problem. This is especially funny (annoying) because I ran a disguised poll on Twitter asking if someone would pay extra if they caused the damage or just let the everyone else pay, and 92% said they'd pay the extra. But they never do in real life.↩︎

2: I'm also working full time for a big company again, but I'm still indie at heart. ↩︎

My WWDC 2019 Wish List

WWDC 2019


Everyone seems to have their own list of things they want to see at WWDC, so I figured I should throw mine down on virtual paper too. I'll keep it short for you and mostly just include things that aren't on everyone else's lists. [Note: You may notice this is almost exactly like my list from last year, maybe I'll get more of my wishes granted this time around.]

App Stores:

  • ✅ (Partial, tvOS is the exception, of course.) they all get the 2017 update, adding curation etc.
  • (macOS only) allows more powerful (read non-sandboxed) apps back in the store.
  • commission rate change: 5% for apps sold via a deep link, 15% for apps sold via search/browse, 30% for apps sold via curation stories/app lists/features.
  • ability for devs to merge SKUs, i.e., combine X and X Lite into one app. Any user that had downloaded either now gets the merged version and the receipt lets the dev know which one(s) the user originally downloaded. (Odds increase for this one this year, since it could help with Marzipan apps as well.)
  • ability for users to browse all stores on any device, make a purchase, and have the app installed on a different device. I should be able to browse the tvOS AppStore on my Mac, buy a tvOS app and have it install on the family room Apple TV.
  • new badges on every app that indicate features/warnings, such as: age rating, whether or not the app is sandboxed, has passed an accessibility audit, if there's a complimentary macOS/iOS/watchOS/tvOS app, is on your wish list (which they need to bring back), etc. (Hat tip for the accessibility audit idea from Marco Arment on Under the Radar) (Bonus points if there are icons that indicate third party analytics and/or similar frameworks embedded).
AppStore screenshot showing 1Password with new App Badges

iOS:

  • ability to set default apps for email, web, calendar etc.
  • add app shortcuts to Control Center. (Not quite as desired anymore since I work on Launch Center Pro, you should use that instead! 🤪)
  • better control of audio, routing and setting different volumes (ring vs media etc). Rumours suggest something is coming here, hopefully not just a UI change with the same limited functionality.
  • landscape support for Face ID. (Works for iPad Pro now, should work on iPhone too).
  • ✅ multiple faces for Face ID.
  • bring the iPad keyboard to iPhone (the swipe down on a key for the alternate version feature).
  • more granular selection of contacts to allow calls from when in Do Not Disturb mode.
  • multi-user support (for iPhone and iPad).
  • ability to block calls for anyone not in your contact list.
  • fix auto-capitalization. There are a few issues with the way iOS auto-capitalizes letters when typing. First: when iOS determines you need a capital next, you can’t change its mind, for example, let’s say you type “Hi. The dog...”, then realize the period was meant to be a comma, so you use your finger to move the cursor there and change it, then move the cursor to between the T and h, backspace to correct the capital T to a lowercase t. But no, iOS makes it a capital T again, based on the original decision, not based on the current text. Second, and even worse, if using a hardware keyboard, when it decides you need a capital next, there is no way to type a lowercase letter. Tapping the hardware Shift doesn’t undo the pre-pressed software shift. Typing Shift-Letter gives you uppercase, caps lock gives you uppercase. You have to type the letter you want twice, and then delete the first one. (It’s possible this is a bug with the Logitech keyboard I have. Update: Angelo Cammalleri reports this happens with Apple’s keyboard as well).
  • remove the stranglehold on apps, either allow distribution outside of the App Store, or at least stop rejecting apps that Apple doesn’t like. I prefer the walled garden over the Wild West of Android, but perhaps make the walls lower for legit businesses/apps, and higher for the scam apps. If Apple can’t tell the difference, let us crowd-source problem apps.

macOS:

  • the ability to lock the dock to one screen. Having it randomly fly around all my other screens has driven me nuts for years, especially when I go to click an icon on the dock and then the dock runs to a different screen so I can't click it.
  • ✅ HomeKit support
  • fix spaces: when an app has a window in a space and the app crashes, put the window back in the space when it reopens. Safari is the worst for this, I’ll have 20 windows across multiple spaces, it’ll crash, and every window moves to the current space.
  • when booting up, remember which display is where in the arrangement. This has gotten better, but occasionally it still randomly flips displays around on boot up.

tvOS:

  • a built-in web browser.
  • enable UIWebView/WKWebView in tvOS apps.
  • multi-user support.
  • for the love of all that is holy, give tvOS some reason to continue to exist.

watchOS:

  • complications that can update more frequently (1 minute intervals). Even if this requires user permission to update that often.
  • custom watch faces.
  • always on display.

Xcode:

  • plug-in system, at least restoring functionality that was lost in Xcode 8. I'd even be happy with just a way to restore colour to the console logs.

HomeKit:

  • when using automation to turn on a light, be able to turn it off after x number of hours without a second automation. Right now this feature exists, but is limited to 60 minutes. I have several lights that I turn on at sunset, and off at sunrise. They all require 2 automation tasks. Being able to say turn off in 8 hours, would simplify things.
  • display more than just ‘light’ when listing devices in the automation section.

Mac Mini:

  • ✅ (Partial) updated Mac Mini's. Maybe even a Mac Mini Pro with Coffee Lake CPUs, Dual 10 GigE ports, USB-A and C/Thunderbolt 3 ports. Up to 128 GB RAM, 4 TB SSDs. Able to drive 3 5K displays. (We got an update, nearly the exact specs I requested!)

MacBook Pro:

  • ✅ (Partial) updated, with a fixed keyboard design. Coffee Lake CPUs, Up to 64 GB RAM, 4 TB SSDs.
  • option to include the Touch Bar and the standard function keys. I feel most of the hate with the Touch Bar was not with the bar itself, but the removal of the function keys (especially the escape key). I’d buy a MBP that included both.

iPad Pro:

  • ✅ Face ID.

I really wish I could be in San Jose for WWDC this year. It's been a while since I’ve been out with my fellow developers, so you’ll have to have a beer for me. Stay safe, have fun, and hopefully I'll see you next year!


If you've found this article interesting, please subscribe to the RSS feed and follow me on Twitter, Micro.blog and/or Mastodon

It would be awesome if you'd download our newest app All the Rings. It's free and we really think you'll like it!

If you see any errors, want to suggest an improvement, or have any other comments, please let me know.

Copyright

© 2018 Dave Wood

Mix and Match Swift 3 & Swift 4 Libraries with CocoaPods

With Xcode 9, it’s possible to mix and match Swift 3 and 4 libraries together. In the build settings for the project you set the version of Swift to use by configuring the SWIFT_VERSION setting. You’re able to override the project setting at the target level, thereby building some targets with Swift 3, and others with Swift 4.

If you’re using CocoaPods as your dependancy manager, there’s an issue when mixing and matching.

As you know, when using CocoaPods, you end up with an Xcode workspace that contains your main project, and a Pods project. Whenever you run pod install or pod update, CocoaPods will set the SWIFT_VERSION for all targets to be whatever your main project is set to, or it will fallback to Swift 3 if the main project doesn’t have the SWIFT_VERSION specified.

This means Xcode will try and compile all targets with the same version of Swift, regardless of what version of Swift is actually needed. There’s no built-in way for you to specify the version of Swift to use for each pod you’re including. There is a way for the pod maintainer to specify the version needed in the podspec (they need to set pod_target_xcconfig = { 'SWIFT_VERSION' => '4.0' } see XCGLogger.podspec for an example), but I’ve found it’s rare at this time for it to be set (hopefully this post will help change that).

Even if the pod sets the version of Swift to use, we run into a problem when Xcode resolves the setting. Xcode will prefer the target’s direct setting over the podspec’s suggestion, and since pod update always sets a direct setting on the target, the pod spec’s suggestion is never used (not surprising it’s rarely set).

The solution is to add a post_install script to the end of your podfile:

Let's examine this script.

It’s a post_install script so CocoaPods will execute the script after is has updated all of the included pods and updated the project file.

The script starts by looping through the build configurations of the Pod project and sets the default Swift version to 4.0 (lines 2-5).

Then it loops through all of the project’s targets (lines 7-19). It checks the target name against a known list of targets (line 8) and sets each of the configurations for matching targets to Swift 3 (lines 10-12). If the target isn’t in the known list, the script unsets the Swift version (lines 15-17), which will allow the pod to set the version itself using the pod_target_xcconfig setting we noted above. If the pod doesn’t set the version, Xcode will use the default Swift version we set at the start.

You will need to tweak the script for your project, specifically to set your default Swift version, and then to add the targets that require a different version on line 8.


If you’ve found this article helpful, please subscribe to the RSS feed and follow me on Twitter

It would be awesome if you’d download our new app All the Rings. It’s free and we really think you’ll like it!

If you see any errors, want to suggest an improvement, or have any other comments, please let me know.

The First Essential Swift 3rd Party Library to Include in Your Project

As we all scramble to learn this fantastic new language Apple gifted to us at WWDC 2014, we're coming across new ways of doing things, either because the new way is better, or because the old way is no longer possible.

One of the main features that Swift has taken away, is the C preprocessor. That's what enabled #define's to work. A common #define used is for debug logging, to include useful info with every line.

#define DLog(...) NSLog(@"%s(%p) %@", __PRETTY_FUNCTION__, self, [NSString stringWithFormat:__VA_ARGS__])

This lets us go from this:

NSLog(@"Simple Message");
2014-06-08 05:38:54.649 TestApp[35062:60b] Simple Message

to this:

DLog(@"Simple Message");
2014-06-08 05:38:54.649 TestApp[35062:60b] -[TSTAppDelegate application:didFinishLaunchingWithOptions:](0x10961f2e0) Simple Message

We now get a lot more info in our log messages and can see where in our code the log message came from without having to type it in for every line.

In Swift, we lost this functionality. The reason this was traditionally done with a #define, and not a function or class, is so that we can use the __PRETTY_FUNCTION__, __FUNCTION__, __FILE__, and __LINE__ macros. The preprocessor replaces those macros with their actual values. For example, __FILE__ will always contain the filename where the macro is placed for example. If you were to use them in a logging function, the macros would always contain the information of the logging function, not the calling function, rendering them useless.

This looked like it was going to be a major inconvenience in Swift so I filed a radar about it: http://openradar.appspot.com/17170702. After playing with Swift for a while, I've discovered a solution. I've built a library you can use in your projects.

Introducing XCGLogger

XCGLogger is my first open sourced third party library, that I think will be essential to add to your project.

The source can be found on GitHub here: https://github.com/DaveWoodCom/XCGLogger, with basic instructions on how to use it.

At a glance, it will change your logs from this:

Simple message

to this:

2014-06-09 06:44:43.600 [Debug] [AppDelegate.swift:40] application(_:didFinishLaunchingWithOptions:): Simple message

By writing code like this:

log.debug("Simple message")

instead of this:

println("Simple message")

A few things to note:

  1. Swift is brand new and in a state of flux, so it — and any libraries using it — will be subject to frequent changes.
  2. This is my first released library, so please let me know what you think and please share any ideas for improvement.
  3. There is a bug in Xcode 6 when using __FUNCTION__. XCGLogger uses a workaround for now, but will remove that once the bug is fixed. See: http://openradar.appspot.com/17219684
  4. This library is intended for use in Swift projects. There's no Objective-C compatibility included in it at this time. If it's a requested feature, it can be added.

Since Swift is brand new, there are a lot of different ways to accomplish the same thing. Over time, some best practices and patterns will emerge. I've used what I think are good practices and patterns in this library and hopefully they'll be helpful for developers as we work to establish what's best. For example, how to store static tokens for dispatch_once calls, shared instances, and global variables etc.

How does this work when I said earlier that using __FUNCTION__ and its friends in a function only gives you the information in the function instead of where it's called? Well, that's the secret sauce I discovered last week. If you set the default value of a parameter in a function to one of the macros, the compiler fills in that value at the calling location giving us the effect we need. Giving us access to the correct macro values inside the function that's called.

If you find this library helpful, you'll definitely find these other tools helpful:

Watchdog - monitors Xcode® and automatically cleans up stale cache files

Slender - cleans up Xcode projects, removing duplicate and/or unused assets

Briefs - powerful app prototyping, lets you and your clients try before you build

Follow me on Twitter @DaveWoodX

Copyright

© sabby

Improving Your Image Workflow

No doubt you're excited about the new iPad being released next Friday. Me too! I've been hoping for an iPad with a Retina display since the days of the original iPad. In celebration, here are a few tips to make creating your images a little easier. These of course work for iPhone too.

{emailcloak=off}First, it goes without saying (but I'll say it anyway), you need to create the high res version of the image to start with. I use Adobe's Illustrator and Photoshop for most of my graphics. (Actually, my Wife uses Illustrator mostly, while I import her stuff into Photoshop for any pixel level tweaks and to ensure sizes are consistent etc). For the most part, that means I have images in Photoshop with one image per layer. I use one .psd file for all images of the same size in the app.

When I have a part of the app that needs multiple images, say for a menu, each menu item will be on it's own layer, if there are separate overstate images, they also get their own layer.

Even Steven

Make sure your canvas width and heights are even numbers. If you have an odd number you'll get slight cosmetic errors and off by 1 pixel effects.

Mass Export

Name the layer with the desired filename for that image. Eg: btnMenuItem1@2x etc. Make sure you include the @2x part.

Now you can use Photoshop's Export Layers as Files script to quickly create PNG's of all the images in your .psd file. Leave the File Prefix blank, and make sure you uncheck the 'Trim Layers' option which is always defaulted to on or some of your image sizes will be altered and could end up odd.

Honey, I Shrunk The Files

Next you're going to need to do some setup.

Setup Step 1: We're going to use the awesome ImageMagick tools, so you'll need to install them. The quickest way is to use MacPorts, follow the instructions here.

Setup Step 2: Copy the following script to somewhere in your path. I use ~/bin, but other options will work.

~/bin/1x (Download):

#!/bin/bash

## Copyright (C) 2012 Cerebral Gardens http://www.cerebralgardens.com/
##
## Permission is hereby granted, free of charge, to any person obtaining a copy of this
## software and associated documentation files (the "Software"), to deal in the Software
## without restriction, including without limitation the rights to use, copy, modify,
## merge, publish, distribute, sublicense, and/or sell copies of the Software, and to
## permit persons to whom the Software is furnished to do so, subject to the following
## conditions:
##
## The above copyright notice and this permission notice shall be included in all copies
## or substantial portions of the Software.
##
## THE SOFTWARE IS PROVIDED "AS IS", WITHOUT WARRANTY OF ANY KIND, EXPRESS OR IMPLIED,
## INCLUDING BUT NOT LIMITED TO THE WARRANTIES OF MERCHANTABILITY, FITNESS FOR A
## PARTICULAR PURPOSE AND NONINFRINGEMENT. IN NO EVENT SHALL THE AUTHORS OR COPYRIGHT
## HOLDERS BE LIABLE FOR ANY CLAIM, DAMAGES OR OTHER LIABILITY, WHETHER IN AN ACTION OF
## CONTRACT, TORT OR OTHERWISE, ARISING FROM, OUT OF OR IN CONNECTION WITH THE SOFTWARE
## OR THE USE OR OTHER DEALINGS IN THE SOFTWARE.

CONVERT=/opt/local/bin/convert
IDENTIFY=/opt/local/bin/identify

if [ $# -lt 1 ] ; then
	echo "Usage: ${0} filename@2x.ext"
	exit
fi

for ARG in "$@"; do
	FILEPATH=`dirname "${ARG}"`
	FILENAME=`basename "${ARG}"`
	FULLNAME=${FILEPATH}/${FILENAME}

	PHOTOSHOPTEST=${FILENAME#_[0-9][0-9][0-9][0-9]_}

	if [ "${PHOTOSHOPTEST}" != "${FILENAME}" ] ; then
		mv "${FULLNAME}" "${FILEPATH}/${PHOTOSHOPTEST}"
		SOURCEFILE=${PHOTOSHOPTEST}
	else
		SOURCEFILE=${FILENAME}
	fi

	IMAGENAME=`expr "${SOURCEFILE}" : '\(.*\)@2x.png'`
	EXTENSION=`expr "${SOURCEFILE}" : '.*@2x.\(png\)'`
	DESTFILE=${IMAGENAME}.${EXTENSION}
	FAILNAME=.
	BLANKS="                                                  "

	if [ "${DESTFILE}" != ${FAILNAME} ] ; then
		${CONVERT} "${FILEPATH}/${SOURCEFILE}" -resize 50% "${FILEPATH}/${DESTFILE}"

		FILENAME_LENGTH=${#IMAGENAME}
		SOURCE_WIDTH=`${IDENTIFY} -format "%W" "${FILEPATH}/${SOURCEFILE}"`
		SOURCE_HEIGHT=`${IDENTIFY} -format "%H" "${FILEPATH}/${SOURCEFILE}"`
		DEST_WIDTH=`${IDENTIFY} -format "%W" "${FILEPATH}/${DESTFILE}"`
		DEST_HEIGHT=`${IDENTIFY} -format "%H" "${FILEPATH}/${DESTFILE}"`

		echo "${IMAGENAME} - @2x : ${SOURCE_WIDTH}x${SOURCE_HEIGHT}"
		echo "${BLANKS:1:${FILENAME_LENGTH}}   @1x : ${DEST_WIDTH}x${DEST_HEIGHT}"

	else
		echo "Skipping: " "${FULLNAME}"
	fi
done

Once you're setup, and after running the export script, you'll have a series of files in the export folder with names like _0000_btnMenuItem1@2x.png, _0001_btnMenuItem2@2x.png etc. Drop to a terminal in that folder (Go2Shell works great for this). And run the script you created above for each file you've exported. You can do this one file at a time:

1x _0001_btnMenuItem2\@2x.png

or for a collection of files at once,

1x *

What this script does, is chop off the _xxxx_ part of the filename (if it's there), then create a @1x version of the image with the appropriate filename. It will skip any file that doesn’t match the filename@2x.ext format.

The script will also print out the original image dimensions along with the new image dimensions as a quick way to ensure you don't have an odd sized image. (It's ok for the @1x image to have odd dimensions).

Size Apparently Does Matter

Take a look at the sizes of your final images. Apple recommends using PNG files, but they're not always the best solution. Some images just do not compress well as PNG files and are better suited as JPG files (assuming you don't need alpha transparency). For example, an @2x image in my upcoming iPad game was over 5 mb in size as a PNG and just 305 kb as a JPG. There is no discernible difference in the way the file looks or behaves as a JPG, but 10 million users (fingers crossed) will each save 6 mb of space on their iPads (the @1x version went from 1.3 mb to 85 kb).

Get Your App To The Gym

Check out Slender in the Mac App Store. Run your project through it and it'll catch any odd size images, or extra images you're no longer referencing in your app. It can even automatically remove the extra images from your project for you (saving a backup first of course).

On a completely unrelated note, we've launched a Cerebral Gardens Facebook page. If you use Facebook, it would be swell if you'd head over there and do the like thing. Thanks!

Enumeration of NSMutableArray's Follow Up

Today I'm going to follow up on some interesting comments to my previous tip regarding enumerating NSMutableArray's.

I had suggested to make a copy of the mutable array before enumerating, in order to prevent another thread from modifying the array you're working on and causing a crash.

It was mentioned that making that copy is itself an enumeration and so we were just moving the crash point. So, I did some digging.

// array is an NSMutableArray
- (IBAction)button1TouchUp:(id)sender
{
    DebugLog(@"Populating Array");
    dispatch_async(dispatch_get_global_queue(DISPATCH_QUEUE_PRIORITY_DEFAULT, 0),
    ^{
        for (int i = 0; i < 10000000; ++i)
        {
            [array addObject:[NSNumber numberWithInt:i]];
        }
        DebugLog(@"Done Populating Array: %d", [array count]);
    });
}

- (IBAction)button2TouchUp:(id)sender
{
    DebugLog(@"Enumerating Array");
    dispatch_async(dispatch_get_global_queue(DISPATCH_QUEUE_PRIORITY_DEFAULT, 0),
    ^{
        DebugLog(@"Copying Array");
        NSArray *copyOfArray = [array copy];
        DebugLog(@"Done Copying Array");

        long long x = 0;
        for (NSNumber *number in copyOfArray)
        {
            x += [number intValue];
        }
        DebugLog(@"Done Enumerating Array: %d", [copyOfArray count]);
    });
}

Note: if you test this, do so in the simulator, a device will generate a memory warning and shutdown the test app.

The idea here is that by touching button1, we create a large array in a thread, and touching button 2, we enumerate that array. The array is large enough that it gives you time to ensure you touch button 2 while button 1's thread is still populating the array. If you didn't create the copy of the array before enumerating it button 2, the app will crash. Using the copy of pattern I mentioned in the last post, prevents that crash as expected.

Taking this a little further, the test code shows that when you take a copy of the mutable array, you get a copy of it at in its current state. If something is altering the array when you make the copy, you could get a copy of the array in an unusable or unexpected state. If you were adding or removing elements for example, you might have half of the elements in your copy while expecting all of them, or none of them.

If you need to ensure changes to an array are completed in full before another thread accesses it, you can use the @synchronized directive. The modified code looks like:

- (IBAction)button1TouchUp:(id)sender
{
    DebugLog(@"Populating Array");
    dispatch_async(dispatch_get_global_queue(DISPATCH_QUEUE_PRIORITY_DEFAULT, 0),
    ^{
        @synchronized(array)
        {
            for (int i = 0; i < 10000000; ++i)
            {
                [array addObject:[NSNumber numberWithInt:i]];
            }
            DebugLog(@"Done Populating Array: %d", [array count]);
        }
    });
}

- (IBAction)button2TouchUp:(id)sender
{
    DebugLog(@"Enumerating Array");
    dispatch_async(dispatch_get_global_queue(DISPATCH_QUEUE_PRIORITY_DEFAULT, 0),
    ^{
        @synchronized(array)
        {
            DebugLog(@"Copying Array");
            NSArray *copyOfArray = [array copy];
            DebugLog(@"Done Copying Array");

            long long x = 0;
            for (NSNumber *number in copyOfArray)
            {
                x += [number intValue];
            }
            DebugLog(@"Done Enumerating Array: %d", [copyOfArray count]);
        }
    });
}

The @synchronized directive creates a lock on the object for you.

A few points to be aware of:

  1. you need to use @synchronized around all places where you need to lock the object.
  2. the code will block until the object can be accessed, so if thread A is using the object thread B will pause until thread A is done with it, so be sure not to create a block on the main thread.
  3. if you define a property on a class as atomic, by omitting the non-atomic keyword, the synthesized accessors will include synchronization code and simply the code for you, but you still need to be aware of the blocking issues.

As always, I love reader feedback. Especially when you point out my mistakes, since that's the fastest way to learn more.

A Simple Tip to Avoid Crashes

As you may be aware, I went full time indie a couple of months ago. I've been working almost as many hours as I can stay awake for clients, and spending whatever extra time I can find on a new game that I hope will be finished and submitted to the App Store before my next blog! I can't wait to tell you guys all about it.

With all this work though, I've been slacking in the blog department. Today I start to correct that. Here's a quick tip for today that may save you from a few crashes tomorrow.

It's a common sight to see something like this in Objective-C, where you're enumerating through an array (that's mutable), and doing something to each of the objects:

// self.objects is an NSMutableArray
for (NSObject *object in self.objects)
{
    [object doSomething];
}

If your app is multithreaded, you'll get a crash if another thread adds to or removes from the array at the same time this loop is being processed. Depending on timing, you might not see this bug hit until the app is being used by users.

Instead, anytime you're going to run through an array like this, make a copy first and enumerate the copy. Now you're multithreaded safe.

NSMutableArray *copyOfObjects = [self.objects copy];
for (NSObject *object in copyOfObjects)
{
    [object doSomething];
}
[copyOfObjects release]; copyOfObjects = nil;

Here's another common pattern you'll see, when you're enumerating the array in order to remove certain elements from it. Because you know you can't remove objects from the array as you're running through it, you create another array to store the the objects you want to remove and then remove them in a second step:

NSMutableArray *objectsToRemove = [[NSMutableArray alloc] init];

// self.objects is an NSMutableArray
for (NSObject *object in self.objects)
{
    if ([object shouldBeRemoved])
    {
        [objectsToRemove addObject:object];
    }
}
[self.objects removeObjectsInArray:objectsToRemove];
[objectsToRemove release]; objectsToRemove = nil;

Using the copyOf pattern above, you can remove the objects in a single step, since you're not actually enumerating the same array anymore:

NSMutableArray *copyOfObjects = [self.objects copy];
for (NSObject *object in copyOfObjects)
{
    if ([object shouldBeRemoved])
    {
        [self.objects removeObject:object];
    }
}
[copyOfObjects release]; copyOfObjects = nil;

Now you have nice, clean, efficient, crash free code.

Add the Power of Dropbox to Every App

Ok, maybe not every single app, but if your app has any sort of data, then yes, you should add Dropbox support to the app. Certainly if the app is a tool of some sort, you understand that the user values the data that has been generated; but even if the app is a game, the user still values that data! If they've spent 5 hours to complete a tonne of levels, it's nice to have that accomplishment backed up, or available on a second device. This is where Dropbox comes in.

If you've been living under a rock and don't know what Dropbox is, it's a service that allows users to create a special folder on their computer that automatically syncs itself to the Dropbox servers and then any other computers also using the same account. This provides the user with a cloud based backup service (with a basic version control too). Using the official Dropbox iOS, Android and Blackberry apps, the user can access any of the files in their Dropbox account on the go. Sounds simple, and it is. So simple that everyone should be using it (especially since the basic service is free).

So how can you use this magical service in your apps? Dropbox provides an SDK for developers that lets you access a user's Dropbox account (with their permission of course). Now it's up to you to implement a solution to use it.

Before I go into detail on using the SDK (a future post), I'm going to suggest a directory hierarchy that we all follow. Remember that the root folder of the Dropbox is actually a directory on the user's computer that they're using. We don't want to clutter that folder with all kinds of stuff the user doesn't understand, they're likely to delete it.

One of the first apps I used that was Dropbox enabled was 1Password (An awesome app by the way). Their solution was to create a file called

.ws.agile.1Password.settings

in the root folder that only contained the location of their actual data. This lets users store their data wherever they want (provided it's still under the main Dropbox folder), and 1Password can still find it. There's a problem with this though, when you have lots of apps installed, all using a similar plan, you're going to have a tonne of junk in the root folder. Not user friendly at all. Not to mention, that while Mac OS X will hide a file starting with a dot by default, some of your users might not have switched from Windows yet and Windows will show the 'hidden' file in the folder, just waiting to be deleted.

My proposal, is that we create a folder in the Dropbox root called

.apps

as a central repository for third party app data. From there you use a reverse domain name system similar to your bundle id, but instead of dots, use new directories, and only use lowercase. So keeping with the 1Password example, they would store their data in

.apps/ws/agile/1password/

This will be consistent for their iPhone, iPad, Android, Mac OS X and Windows clients. All of their 1Password apps will be able to find the data regardless of system being used. Any data that is system specific can be stored further down the hierarchy.

This system should keep everything clean, organized and out of view of the user. Windows users will still see the .apps folder but at least it's just one folder and it's name should make it's meaning clear to most users.

Be aware that because you're now backing up your user's data to their Dropbox, they can now easily browse (and even modify) that data if they're so inclined. So make sure you protect this data if it shouldn't be seen or modified. For example, if you're game has 10 levels and you have to complete them in order to advance to the next one, don't record level completion in a simple format that lets the user effectively just check off that they've completed a level. If reading the data is ok (high score list etc), you can still use a simple format to store the info, just add some sort of validation to ensure the file hasn't been modified. A hash file will probably be fine for most simple cases (use some salt that you're keeping secret).1

Update (added this paragraph that was accidentally cut during my editing phase): Why bother using Dropbox in your app when iTunes backs everything up during a sync anyway? Well there are lots of reasons:

  • Not everyone syncs on a regular basis; shocking I know
  • If a user deletes an app, it deletes the data too, next sync, the backup is deleted too, if the user decides to put your app back on their phone, they have to start from scratch
  • Using Dropbox allows multiple devices to access the same data, play a game on your iPad, and continue later on your phone
  • It may be your app, but it’s the users data, so making it easy for them to access is a good thing

1 Note that the above point about checking for modified data files etc is vital even if you're not syncing to Dropbox, it's trivial for users to access/modify your data files through jailbreaking or even iTunes backups. Another issue is that the Dropbox folder is exposed to unknown other apps that might try to use the data contained within maliciously, scan for emails to spam, or account passwords etc. Those apps could be Windows malware etc so definitely encrypt sensitive data.

8 Developer Tools You Should Use

Today I'm going to cover some awesome developer tools that can make your life easier. These are listed in no particular order.

AppViz: http://www.ideaswarm.com/products/appviz/

AppViz is a tool for automatically downloading your sales, trends and financial reports from iTunes Connect, as well as the reviews for your apps. The app works by scrapping the information from the web so it breaks whenever Apple changes something at iTC, but, IdeaSwarm, the creators, are insanely fast at analyzing the changes and pushing out an update to accommodate. This is by far the best $30 I've spent, and to be honest, I don't know of a single developer with published apps, that isn't already using AppViz. So I guess this tip is for newbies. Get this app now, you'll love it.

MajicRank: http://majicjungle.com/majicrank.html

MajicRank by David Frampton (of Chopper 2 fame) is the tool to use to track how your apps are doing in the top 200 lists. It scans all regions, so you can see results in countries you can't normally access. It's similar to AppViz in that it scraps info from the web and so it can break, but it rarely does. MajicRank is free so there's no excuse not to use it.

TestFlight: http://testflightapp.com/

I mentioned TestFlight a couple of weeks ago but they're worth adding to this list too. They've created a great service so far, it's almost too easy to use! There are still some kinks to work out, but note that they moved quickly to resolve the security issue I pointed out in the last article.

DropBox: http://dropbox.com/

DropBox is a fantastic cloud storage system for users. It lets anyone backup important files or easily transfer files to another place/person effortlessly. They provide an SDK that lets you add DropBox support to your apps so that you can let your users backup and/or transfer their app data easily.

Amazon AWS: http://aws.amazon.com/

Amazon Web Services actually consists of several great tools. The two most popular so far seem to be S3 (another cloud storage system, but intended for companies not users), and SimpleDB (a simple database in the cloud). If your app is data intensive, there doesn't seem to be a better solution than Amazon for hosting that data. They now have a free starter plan too so you can try it out at no risk.

Matt Gemmell: http://mattgemmell.com/

Mr. Matt Legend Gemmell isn't really a dev tool, but he does make a few that you can use in your apps. The most popular ones are MGTwitterEngine (an implementation of the Twitter API) and MGSplitViewController (a replacement for the iPad's UISplitViewController that gives you more control/options). Check them out here: http://mattgemmell.com/source

Accessorizer: http://www.kevincallahan.org/software/accessorizer.html

I found out about Accessorizer through Jeff LaMarche who said it was one of his favourite apps. I can see why. The app is a source code generator. You teach it your coding style, and then it pumps out code for you. No, it won't build your next app for you, but it will save you tonnes of repetitive typing setting up all your class properties etc. If you value your time, Accessorizer will save a lot of it for you.

TouchXML: https://github.com/TouchCode/TouchXML

TouchXML is a library for reading in and parsing XML files. If you store your app's data and/or configuration in XML files, this is a far faster way of getting that info than using libxml. You can quickly extract exactly what you need from XML in just a few lines of code. Truly indispensable. And if you'd prefer JSON over XML, there's a TouchJSON available too.

Hopefully some of these tools will help you or a friend on your next project.

TestFlight Your Apps

You've been working on your new app for ages and it's finally ready for beta testing. Prior to iOS 4.0, it was a considerable pain in the neck to get a build on to your testers devices. You needed to package up your apps and ad hoc profile, send them to each tester, and then they needed to use iTunes to install the profile and app on their device. It seemed like an art more than a science getting an app installed, never mind an updated build later. It was a very clunky system, and it didn't always go smoothly.

With iOS 4.0, Apple made it much easier to install test apps on a device. It's now possible to install profiles and apps without going through iTunes. Using XCode's Build and Archive option, you can create an .ipa file that embeds the ad hoc profile. Just put the .ipa file on a web server, (or your public Dropbox folder), and send the link to your testers. They can install the build by clicking the link in mobile Safari.

You're still required to collect your users UDID's, add their devices to your developer account and create an ad hoc profile that includes their devices.

Last week, TestFlight, a new service for distributing your test builds to your beta testers, went live. TestFlight promises to revolutionize the way developers beta test their apps, and after testing it out for a bit, I'm pretty sure they're going to do just that.

The free service, found at testflightapp.com, allows a developer to invite people to become a beta tester. The tester creates an account through the web site in Mobile Safari on their device, and then they register their device with the system. This process involves installing a configuration profile (different from an ad hoc profile, but listed in the same area on the device's settings). This gathers the device UDID and reports it back to the server. A tester can register more than one device. The tester, and her device(s) then show up in the developer's account. As a developer, you can export the UDID's of all your testers and import them into Apple's iOS Provisioning Portal. One issue I found here though, is that if you attempt to import a file of UDID's that contain a record that you've already added to the Portal, it will reject the entire file, instead of just ignoring that record.

Once you've imported all the new UDID's into the iOS Provisioning Portal, you can update your ad hoc profile to include all of your testers. Then, use it to create a test build of your app. You still need to use XCode's Build and Archive Option, and then use it's sharing wizard to create the .ipa file (all in all, a simple process, more details here: http://iphonedevelopment.blogspot.com/2010/05/xcode-32-build-and-archive.html).

Next, you upload your .ipa file to the TestFlight web site, and select the testers you'd like to notify of the new build. TestFlight emails each of them a link to a page that lets them install the build easily.

TestFlight lets you see how many times the .ipa file was downloaded (though, not by whom for some reason). I had one person delete it from their phone and redownload it, and it counted as another download. So a list of 5 people, with 5 downloads, doesn't really mean they all downloaded it. But it will likely be close.

I tested this entire process with some extremely non-technical people, not one had an issue. They were all able to create their accounts, register their devices, and install my test app with ease.

If you need more beta testers, TestFlight offers a recruitment tool. You can start recruiting random people through Twitter, your web site, or wherever. It's just a link you post. When people sign up to be a beta tester for you, you can accept or reject them based on whatever criteria you like.

Overall, I'm very impressed with the initial service offering TestFlight has. And, remember, it's entirely free (for now) for developers. They are charging for enterprise accounts.

I do have to point out one concern I have with TestFlight however. During my limited testing of the service over the last couple of days, I uploaded a few builds, sent them out to some testers, including myself, and then deleted the builds. When I went back to one of my test devices, I still had the link open in Safari to do the install, for a build that I had deleted in the TestFlight dashboard. So, I tested, and tried to install the build, that should have been deleted. It installed perfectly. This is my concern, because I had deleted the build! Which means, that TestFlight, is not actually deleting the bits of the builds you tell it to delete, it's just removing them from your dashboard. Whether or not you consider this acceptable is up to you (and your personal level of paranoia) . But remember, that when you upload your .ipa to TestFlight, you're letting unknown people view and test your ideas (yes, the TestFlight people can view and run your .ipa files, if they so choose).

If you are concerned, you can use Hockey to manage your beta installs. It's not as easy to manage as TestFlight, but you con trol everything on your servers so it's arguably more secure.

You can even mix and match some of the TestFlight features (UDID collection, recruitment etc), and then deliver the actual builds via Hockey.

Paranoia aside, TestFlight is excellent so far, and will change the way you deliver your test builds to your testers. Down the road, they plan to support additional features, such as adding analytics so you can view what your testers tested and for how long.

Dev Tips & Tricks

Today I'm going to cover some useful tips and tricks. These are presented in no particular order, and are pretty much unrelated to each other. Hopefully you'll find some, or all of them useful.

1. Regarding the upcoming iPad 2

Reports are starting to surface that the next version of the iPad will support a retina type display. Apple will no doubt repeat what they did with the iPhone 4 and double the resolution (4 times the number of pixels). This makes it easy to support old apps on the new device by employing pixel doubling.

But, you can start preparing for this now! For every iPad image you use, include a higher resolution (double sized) image with the @2x suffix. And for icons, include a 144x144 (double 72x72) icon. I've included a 144x144 icon in all my iPad apps since the iPhone 4 was announced, betting on Apple doubling the iPad resolution. It's cheap to do, and if the predictions are wrong, there's no harm in having an unused icon.

As a sub tip, you should include the following sizes for your icons: 144x144, 114x114, 72x72, 58x58, 57x57, 50x50, 29x29

2. self.var vs var

In your classes, when use the following syntax:

DWClass.h

@interface DWClass : NSObject {
    NSObject *myObject;
}

@property (nonatomic, retain) NSObject *myObject;

DWClass.m

@synthesize myObject;

You're telling the compiler that your new class DWClass will have a property called myObject, and that it should create setMyObject (setter) and myObject (getter) methods to access that property. And that those methods should handle your retain/release cycles for you. Any other objects that need to interact with your myObject property, will do so by like this:

dwClass.myObject // (assuming dwClass is an instance of DWClass)

And this will actually call the appropriate setter/getter for the myObject property, which in turn interacts with the myObject instance variable of the dwClass.

Inside the DWClass however, you can access the property like this:

self.myObject

And the same setter/getter methods are used.

Inside the DWClass, you can also access the myObject instance variable directly just by referencing it. DO NOT do this. If you do that, you're not using the setter/getter methods, which means you're not automatically handling the retain/release calls. This is a surefire way to create hard to find bugs in your code. Plus, there are other problems with doing this. If down the road, you need to do something special whenever that property is accessed or updated, so you ditch the @synthesize and create your own setter/getter methods, you're now going to miss even more than the retain/release calls, you're going to miss whatever else you've added.

This entire tip also applies to non-object properties. Even if you're using a standard int as a property, always use the self.variable syntax to access it. It's just good practice and will save you headaches down the road.

3. Keeping your secrets, secret

Often when you're accessing other services, Twitter, Dropbox, your own servers etc, you may need to store passwords, API keys, etc in your code. It's dead easy to just have a constant like this: @"MySuperSecretKey" and be done with it. If you do that though, you may as well post the secret on your web site for all to see. Since, it's trivial for a bad guy to extract your secret from the compiled code they download from the App Store after your release. This is a bad thing. In the case of Twitter for example, some spammer could put your secret key into a rogue app that spam blasts users. Every one of those tweets will say it was sent by your app, and your legit app will be blocked pretty quickly. Your users will be locked out until you submit a fix and have it approved by Apple, say goodbye to two weeks of sales, not to mention, all the bad reviews you'll receive for selling a non-functioning app.

So, keep your secrets secret, use some encryption inside of your app to encrypt your keys etc. It doesn't have to be complex as the bad guy usually just looks for low hanging fruit (unless they are specifically targeting you). You can use one of the many encryption libraries available, or even roll your own if you're so inclined.

4. Ensure the App Store knows you support multiple languages when you do so

This tip comes from a mistake I made in version 1.0 of the Cruze app. The app supported English and French from the get go, but it was done by detecting the language of the user via code and loading the correct set of files for the primary language. This worked great and was way less work than using Apple's recommended method of localization for every nib etc.

One problem though, once the app was released to the store, the only supported language listed in iTunes was English. Because I used my own language detection iTunes Connect didn't detect French. I fixed this in 1.5 by using Apple's localization on a small dummy text file. One that I don't actually use for anything in the app, but that is enough to trigger the language detection tools Apple uses.

Update: see Ovogame's comment below for an even better way to fix this issue.

5. AppName_Prefix.pch

There's a file in your XCode project named AppName_Prefix.pch (where AppName, is your app's name). This file is included at the top of every source file in your project. It's a great place for you to store any constants you need across your app.

6. A Better NSLog()

A common method of debugging is to add NSLog() calls throughout your code. The messages are echoed to the screen as the code runs and you can see what's happening, giving you hints as to what's causing bugs. When you're finished however, and you want to do your final build, all of those NSLog() calls remain in your final build and all of those strings are available for anyone looking through your binaries to see. Who knows what secrets you might disclose.

Instead of using NSLog(), I use DebugLog(). This is a tweak of a function I’ve seen others use, based on the answer here: http://stackoverflow.com/questions/300673/is-it-true-that-one-should-not-use-nslog-on-production-code.

Add this to your AppName_Prefix.pch file:

#ifndef DebugLog
#ifdef DEBUG
#define DebugLog( s, ... ) NSLog( @"<%p %@:(%d)> %@", self, \
	[[NSString stringWithUTF8String:__FUNCTION__] lastPathComponent], __LINE__, \
	[NSString stringWithFormat:(s), ##__VA_ARGS__] )
#else
#define DebugLog( s, ... )
#endif // DEBUG
#endif // DebugLog

Now, replace all of your NSLog() debugging statements with DebugLog(), and define DEBUG in your debug configuration (sub tip 2: go to your Project Info, Debug configuration, search for Preprocessor Macros, add DEBUG).

After this, use DebugLog() all you like, and the strings are skipped over in your Release and Distribution builds. You also have the added bonus of having the function name and line number included with all debug statements now, making it clear what's generating the messages.

7. *.dSYM files

Whenever you build your app, XCode will output the *.app files, as well as a *.dSYM file. For Debug and Release builds, you can just toss/ignore the *.dSYM file. But for your distribution build, that you're going to submit to the App Store, make sure you keep the .dSYM file. You'll need this later, to analyze crash reports. I'll go into more detail on this in a later post, just know you need to keep the files. For the impatient, you can read more on this here: http://www.anoshkin.net/blog/2008/09/09/iphone-crash-logs/

8. Push Notification Certificates

If you have an app that uses push notifications, you need to generate a certificate with Apple, one of the first steps, is to create a Certificate Request file (CertificateSigningRequest.certSigningRequest), that you send to Apple. Keep this file. When your certificate expires, you'll need to request a new one. You can reuse the same Certificate Request file and skip the first few steps.

9. [object release]; object = nil;

With NSObjects, when you're done with them, you call release to reduce the retain count and let the system know you no longer need it. When that retain count hits 0, the system free's the object and releases the memory allocated back for use later.

It is common practice, to set the object to nil after you call release. This prevents a possible crash later, if you attempt to call a method on an object that has been freed. That's because if you try to call a method on a nil object, the system just ignores it, no error, all is good (or is it). If you don't set the object to nil, then it will still point to the memory address that was allocated for that object. There's a chance that object is still there (if something else was using it and increased the retain count for example). In that case, calling a method on that released object, will still work. But if that memory had actually been released calling the method would cause a crash.

This is why developers often set the object to nil, to prevent that crash in the case of a bug. But, this doesn't fix the bug, it just hides it from you. So, I subscribe to the second school of thought you shouldn't set the object to nil. If you have a bug, let the app crash while you're developing and you'll be able to find and fix that bug. When you no longer have any crashes, you'll know you're (closer to being) bug free, and that you haven't just masked your bugs.

Three’s Company: Multiple XCode Versions Living Together Peacefully

Apple is making fantastic progress with iOS. They continue to release firmware updates and betas at a frequent pace, and with each new release, developers must download and install a new version of XCode compatible with the new firmware. Managing the various versions and their associated firmwares can be a challenge. In this article I'm going to give you a couple of tips that will hopefully help.

It's not uncommon for developers to have multiple versions of XCode installed on the same system in order to support development/testing across a wide range of devices and firmware versions. XCode by default installs in /Developer, and it is common practice to install the latest beta version in /DeveloperBeta. Those testing XCode4 know its default install folder is /XCode4. Personally I found this to be messy and inadequate.

My preferred setup now is to create a directory /XCode and install each version of XCode underneath using the version info as it's base folder name. Currently this looks like this:

/XCode/3.2.3_4.0.2
/XCode/3.2.4_4.1b3
/XCode/xcode4_dp2

When installing XCode in this fashion, you’ll find that in some cases, you won’t be able to install/debug a build on one of your devices because of a mismatch in firmware versions. For example, the XCode 4 Developer Preview 2 was released before firmwares 4.0.2 for iPhone and 3.2.2 for iPad. So if you’ve updated your devices to those firmwares, you’re now unable to use XCode 4 to directly install or debug.

There is a simple fix however. You just need to create symlinks from one version of XCode to another. Assuming you’re using a layout similar to what I’ve detailed above. If you look under /XCode/xcode4_dp2/Platforms/iPhoneOS.platform/DeviceSupport you’ll see folders for each version of iOS that you can install/debug on. 3.2.2 and 4.0.2 are obviously missing. If you’ve installed the latest version of XCode 3 with support for those versions, you can make XCode 4 work with them.

In terminal, issue the following commands to create the required symlinks:

ln -s /XCode/3.2.3_4.0.2/Platforms/iPhoneOS.platform/DeviceSupport/4.0.2 \
	/XCode/xcode4_dp2/Platforms/iPhoneOS.platform/DeviceSupport
ln -s /XCode/3.2.3_4.0.2/Platforms/iPhoneOS.platform/DeviceSupport/3.2.2 \
	/XCode/xcode4_dp2/Platforms/iPhoneOS.platform/DeviceSupport

Similarly, If you’re using the 4.1 beta 3 firmware on your iPhone, you’ll need XCode 3.2.4_4.1b3 installed, and can then enable support for that firmware version in XCode4 also:

ln -s /XCode/3.2.4_4.1b3/Platforms/iPhoneOS.platform/DeviceSupport/4.1\ \(8B5097d\) \
	/XCode/xcode4_dp2/Platforms/iPhoneOS.platform/DeviceSupport

If you have your XCode versions installed under a different directory structure (/Develper, /DeveloperBeta, and /XCode4 etc), you’ll just need to tweak the above lines to point to the correct folders.

A similar trick can be used to allow you to use a base SDK of 3.1.3 or earlier, which is no longer included in the latest versions of XCode. Just create links under the /XCode/Platforms/iPhoneOS.platform/Developer/SDKs to an older XCode that does include support for the SDK you need.

If you have any tips to improve upon this, see an error in what I’ve described, or otherwise have anything else to contribute, please let me know.